Welcome!
If you are looking for editing techniques and methods to process land-based photos of the stars from your DSLR- you are in the right place. I have recorded multiple videos of my editing process from RAW import to JPEG export. We will go over noise reduction, light pollution, color changes, exposure balance and plenty other things.
We will be using Adobe Lightroom 3 for the editing in these tutorials. I have chosen this program, because in my opinion, it has the most powerful, effective, and easy to use Noise Reduction capabilities along with innovative, custom editing functions and intuitive use- all in one program! I have no affiliation with Adobe or Lightroom in anyway. It is simply my preferred editing program. If you do not own this program, you can download a free, fully functional, 30 day trial directly from Adobe. Follow the link below:
https://www.adobe.com/cfusion/tdrc/index.cfm?product=photoshop_lightroom
As with all the other tips and techniques in these tutorials- this is not an exhaustive collection of all methods to edit astrophotography photos- it is instead a collection of techniques and methods that I use- and all in Lightroom 3.
The biggest issue we all have with images of the night sky is High ISO Noise. Our long exposures of the stars and landscape at night are pushing our cameras to the limits of their abilities, so we must understand that there will be a compromise in quality when pushing our equipment beyond it’s normal parameters of regular operation. As camera makers continue to create new technology that see better into the dark, sensors with more dynamic range, and algorithms better managing ISO noise reduction- we will get closer and closer to a clean, noise free image shot at ISO 6400. I believe it will happen some day. It’s just a matter of time. But, until that time comes, we will have noisy, grainy images when working with extremely high ISO’s. We are left to do our best in managing that noise in post production. I do NOT have the end-all answer on how to completely eliminate noise in post. But, I have learned how to dramatically lessen it, clean it up, and put attention on other elements in the picture so the noise is not so apparent. In these video tutorials, I show you how to do so in a repeatable way. I do not go into detail on how to spend 5 hours editing a star picture to enter into a competition. I think you can appreciate that is not possible in this setting. But, I do believe you will pick up some great techniques to put in your deck of cards for editing landscape star photos.
The videos in the following pages are password protected. If you do not have the password it is because you have not sent money in to view these videos. To find out how to receive a password, click on “Cost of Tutorial” on the right, under “Recent Posts.”
I do not like to charge for these tutorials, I really wish everything in life was free! But, it certainly isn’t on my end of things. All the information in the following videos was accumulated over 3 yrs of pursuing star shots. There is a ton of gas money, rented equipment, long weekends, and campsite fees represented in those 3 yrs. To help pay for those costs, and cover trips in the future, I am asking for a donation of $20 to view the tutorials. You can learn from my mistakes at the cost of less than one tank of gas, or spend 3 yrs taking pictures of the stars to figure it out yourself 🙂
For the time being, I do not have a fancy automated website system setup for this process. If enough of you out there sends money to this tutorial, then I will put money back into it to pay for an automated pay/download system. In the meantime, I am a regular guy like you, trying to make this as convenient as I can, with the means that I have. To get the password to view the tutorials you must send a donation to me via Paypal.com. Paypal is a long established money transferring web service. They are safe, secure, and trusted.
If you have an account, it is quick and easy. If you do not, it is also quick and easy to setup an account!
Go to http://www.Paypal.com
Login or create an account.
Click on “Send Money” on the top menu bar
To: “Ben@theStarTrail.com”
Amount: $20
When you click “Send Money” it opens a SECOND screen for confirmation. At the BOTTOM of that screen is a field to send a message along with the payment. It is IMPERATIVE that you include your email address in the message!! I HAVE to have your email address to send you the password to view the tutorials. Do not skip that part.
Click “Send Money”
Paypal automatically sends out an email to me alerting me of your donation. When I receive that email, I will reply to the email address you put in the message with the password to view the tutorials. Please understand- I do sleep at some point, and I am not always by a computer to reply with the password. But, this is no scam, and I will reply with that password as soon as I can. And, hopefully soon, I can set this up for an automated payment/download system. In the time being, this is how it will work. And, just in case you want to- by all means, feel free to donate more than the asking cost as a way of supporting future trips, techniques, tutorials and star images!
Thank you 🙂
I am showing all this editing in Adobe Lightroom 3, so this post is a FAST run through of importing, basic editing, and exporting images in Lightroom 3.
The purpose is for you to get up and running to try the techniques in the other videos, but this is to show you how to get started with the program.
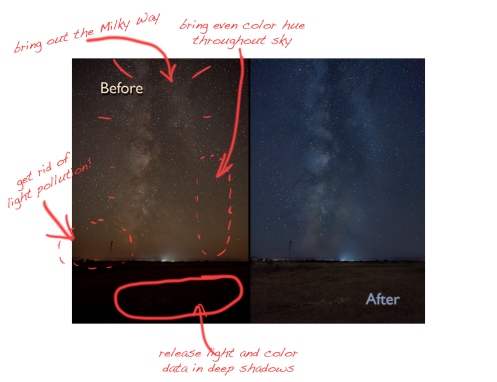
Welcome to a quiet grass airfield outside Maupin, OR. In this tutorial we will focus on:
-Exposure and color balance of the Milky Way
-Bringing detail out of the Milky Way swirls and gases
-Dealing with horizon based light pollution and atmosphere
-Balancing color temperatures throughout the image
-Brightening the foreground
-Noise Reduction
-and, yeahp, much, much more
We will be using Adobe Lightroom 3 for the editing. In my opinion, this program has the most powerful, effective, and easy to use Noise Reduction capabilities along with great, custom editing function and intuitive use- all in one program! If you do not own this program, you can download a free, full function, 30 day trial directly from Adobe. Follow the link below:
https://www.adobe.com/cfusion/tdrc/index.cfm?product=photoshop_lightroom
As with all the other tips and techniques in these tutorials- this is not an exhaustive collection of all methods to edit astrophotography photos- it is instead a collection of techniques and methods that I use. I have done my best to use the tools available to us as best as possible.
The following videos are sequential recordings documenting my editing process of this image from start to finish. Once you have entered the password into the video- it will be remembered on future visits.
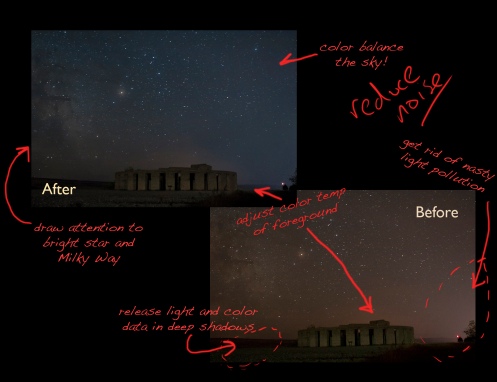
Welcome to the Maryhill Stonehenge Memorial. In this tutorial we will focus on:
-Selective color and exposure balance of the foreground
-How to eliminate the effects of light pollution in our photos
-Bringing attention to the Milky Way
-Noise Reduction (of course)
-and plenty more
As with all the others, we will be using Adobe Lightroom 3 for the editing. In my opinion, this program has the most powerful, effective, and easy to use Noise Reduction capabilities along with great, custom editing function and intuitive use- all in one program! If you do not own this program, you can download a free, full function, 30 day trial directly from Adobe. Follow the link below:
https://www.adobe.com/cfusion/tdrc/index.cfm?product=photoshop_lightroom
As with all the other tips and techniques in these tutorials- this is not an exhaustive collection of all methods to edit astrophotography photos- it is instead a collection of techniques and methods that I use. I have done my best to use the tools available to us as best as possible.
The following videos are sequential recordings documenting my editing process of this image from start to finish. Once you have entered the password into the video- it will be remembered on future visits.
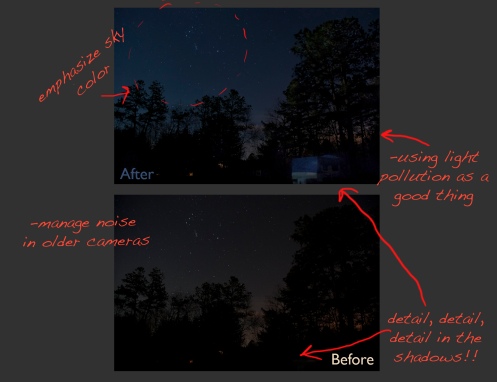
Welcome to a cold night in Maine. Special thanks to Rich Worell for sending in this picture to use as an example for this processing tutorial. I wanted to use this picture from Rich for a couple reasons- all of which I explain in the first video. In this tutorial we will focus on:
-Adjusting color hues in the starry sky
-Finding and drawing out color and light information from dark silhouetted shadows.
-Working with images from older generation DSLR’s.
-Noise reduction
-and plenty more
As with all the others, we will be using Adobe Lightroom 3 for the editing. In my opinion, this program has the most powerful, effective, and easy to use Noise Reduction capabilities along with great, custom editing function and intuitive use- all in one program! If you do not own this program, you can download a free, full function, 30 day trial directly from Adobe. Follow the link below:
https://www.adobe.com/cfusion/tdrc/index.cfm?product=photoshop_lightroom
As with all the other tips and techniques in these tutorials- this is not an exhaustive collection of all methods to edit astrophotography photos- it is instead a collection of techniques and methods that I use. I have done my best to use the tools available to us as best as possible.
The following videos are sequential recordings documenting my editing process of this image from start to finish. Once you have entered the password into the video- it will be remembered on future visits.
Here is the video tutorial that started this madness.
It took soooo many nights of mistakes to get better at shooting stars.
Focus problems, exposure length problems, noise problems, tripod problems, foggy lens problems, missing media card problems, problems, problems, problems. But, on each trip, I got closer to getting a good shot. With each mistake I made, I knew not to make that mistake the next time.
So that’s what this video tutorial is mostly about. Giving you the knowledge and heads up to avoid all the first mistakes I got caught up doing. I don’t want you to waste all the gas and sleepless nights I did on mistakes that can be easily avoided. This isn’t an exhaustive how-to on shooting stars, but it’s got the basics on how to get started, and how to get moving in the direction of getting the star shots you are imagining.
After watching this, take a look at the rest of the video tutorials on how to process the shots you got.
Please, let me know what you think. I have tried to make these tutorials apply to a variety of camera equipment and skill levels. Thought went into the photos that I selected to specifically be generic enough that you can see the correlation of my photos with the images that you are taking. Take the techniques I used and apply them to your pictures!
Thank you for your support, and I look forward to hearing from you.


